

How to Show / Hide, Rename and Reset Admin Columns in Dashboard
Smart Manager lets you manage admin columns for WordPress and WooCommerce from a single place. Show / hide columns, sort columns, rearrange them and more.
To keep things easier to understand, Smart Manager shows the most important admin columns by default for any post type. You can show additional columns or hide them whenever you want. You can sort columns and also change the order of the admin columns in the grid.
Watch this video to see how you can enable / disable and sort admin columns
Steps to Enable / Disable and Sort Admin Columns
You can manage columns in two ways:
Option 1: Using the Manage Columns button
- Go to the Smart Manager dashboard. From the top navigation bar, select a dashboard from the dropdown.
- Click on the ‘Manage Columns’ button at the top of the grid (beside the Custom View dropdown). This will open the Column Manager panel.
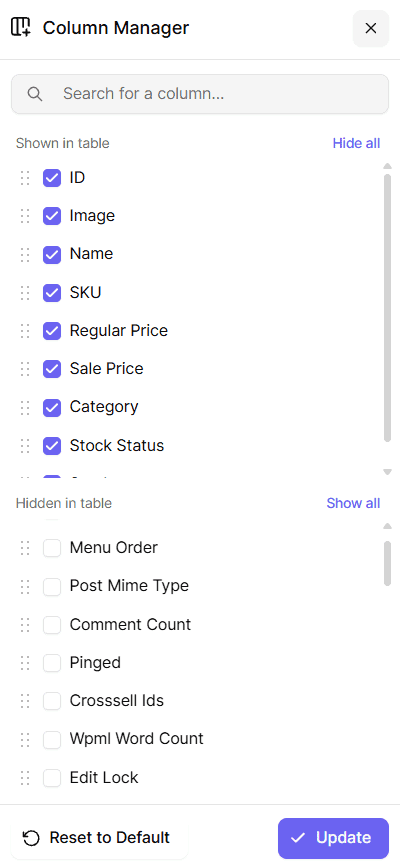
- In the Column Manager panel:
- Under ‘Shown in table’, check or uncheck the columns to show or hide them in the dashboard.
- Under ‘Hidden in table’, check the columns you want to enable, or click ‘Show all’ to display all available columns.
- To hide all shown columns at once, click ‘Hide all’.
- Rearrange columns as per your choice by dragging them up or down in the ‘Shown in table’ list. The columns at the top will be shown first on the dashboard, from left to right.
- Click on ‘Update’ to save your changes.
Option 2: Using the column manager icon on the grid
- Click on the column manager icon in the last column of the grid header. A floating ‘Manage columns’ panel will appear, showing a quick list of currently enabled columns.
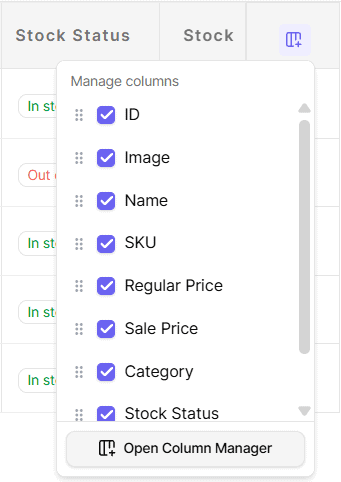
- Check or uncheck the columns to show or hide them directly from this panel.
- Drag the columns up or down to rearrange their order.
- Rename a column by clicking on the pencil icon in front of the column name.
- Click on ‘Open Column Manager’ at the bottom of the panel to access the full Column Manager with more options (show all, hide all, reset to default, etc.).
That’s it. You can then edit and manage records using inline editing, bulk editing, CSV export and other Smart Manager functionalities.
Note – When you export any post type data to CSV, the exported CSV file will include only the columns currently shown in the table.
How to Reset Columns Layout to Default?
When you select any dashboard for a post type for the first time, Smart Manager shows you a default layout with some data columns shown and some hidden.
Based on your requirements, such as exporting to CSV or others, you enable and disable columns and also sort columns. This changes the default layout.
For example, when you select the Products dashboard, it will show some columns and products without variations (default). You click on ‘Show Variations’ to view the variations, and it would show the variations just below the parent product, maintaining the linking.
You also sort the products based on the ‘Regular Price’ column. This changes the default layout, and the variations and their parents are no longer in alignment.
Now, if you want to reset the layout to the default or original one, follow these steps:
- Go to the Smart Manager dashboard. From the top navigation bar, select the dashboard you want to reset the columns for.
- Click on the ‘Manage Columns’ button at the top of the grid (or the column manager icon in the last column of the grid header, then ‘Open Column Manager’) to open the Column Manager panel.
- Click on the ‘Reset to Default’ button at the bottom-left of the panel to reset the columns to their default order and visibility.
Note – Reset columns will reset the dashboard column layout for the user account using which the reset is triggered. Also, the default column layout for a particular dashboard will be the same irrespective of the user.
How to Rename Any Column Name in Smart Manager?
- Go to the Smart Manager dashboard. From the top navigation bar, select a dashboard from the dropdown.
- Click on the ‘Manage Columns’ button at the top of the grid (or the column manager icon in the last column of the grid header) to open the Column Manager panel.
- Hover over the required column, and click on the pencil icon that appears beside it to rename the column.
- Click on ‘Update’ to save your changes (if using the full Column Manager panel).
That’s it.
Note – Rename columns functionality is available in Smart Manager Pro version only.